Showing posts with label artwork review. Show all posts

Thursday, October 25, 2012

Final Project Proposal: Universal Landscapes


The terrain of our neighboring planets serve as a hypothetical landscape for what Earth used to be, could have been or what it might become.  Photographs of synthesized planetary landscapes will be presented as a gallery to create a prophetic possibility of the impact of natural and human acts of destruction.

Most Recent Mars Landscapes


can you find the shiny object on mars?
 Studio Space


Sunday, October 14, 2012

Mars

Monday afternoon I went out the banks of the Brazos river and collected some dirt for the Mars landscape. I felt it had the best texture and closest color to Mars, and with a bit of color gel on the lights it would look like Mars.

Thursday night I started the molds of the rock. I didn't think I would use the mold's for the mars display but knew I probably would for the other planets that had more of a rocky landscape. So I wanted to go ahead and test the molds and see how they would hold up and look in and out of water. After leaving them overnight, I came in Friday night to check the molds. The large molds ripped a hole in the large rock one, but I think I can still reuse the mold with a bit of duct tape fix. I clean the molds up by shaving excess down.
 Saturday morning I went to buy paint, since earlier in the week hobby lobby was out of it. Fortunately the new shipment came in, so I got it and picked up some scrap cardboard to act as a base for the foreground for Mars. I spray painted the rocks, and took them back up to the studio space due to bad weather to let them dry.
 

For my setup I used combination of foam and cardboard to act as a base for the foreground of the landscape.


My Setup

Atmosphere
This was my first run through of doing a landscape with this set up and I learned alot to help prep me for the next photoshoot. One of the first things I experimented with was atmospheric look. The first image is with just clear pure water, and the second image is with dirt/clay in the water. I believe I added too much dirt this time around, so the next round I plan on using much less, but I don't want to leave the water clear, I believe the dirt in the water added more depth to the scene.
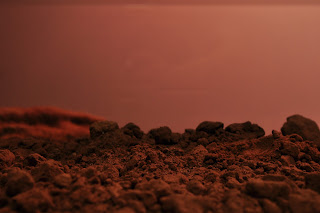
Clear Water
Water with dirt
Lighting
Next I experimented with the lighting. I realized I need more lights. I'm trying to keep my light limit down since it's very dangerous having lights near a water tanks. So for the next round I plan on using 1 v light at the far corner in the room away from the tank with heavy sand bags to help light the foreground, then use the desk lamp to light the water.  Overall I'm trying to get a soft diffuse light for the landscape so it's not stylized and looks more natural to the environment.


Composition
Composition is where I needed the most work on, and 2 major issues I ran into. One was the atmosphere, there was too much dirt in the water so it was hard to see the silhouette in the background since the water was too muddy. Because of that, I couldn't push the rock that much back without it completely disappearing as well.  It takes about 40 minutes to completely empty the tank and clean it out, so I ran out of time to experiment again, but lesson learned. Another issue was not having enough large rocks. I had too many small rocks that disappeared in the tank behind the dirt horizon, thus I couldn't get much depth. Sunday I paid another visit to the banks of the Brazos river and collected a large bucket full of rocks, mostly sandstone, petrified wood (good for silhouettes and other planet landscapes) and some sort of brown jade-ish rock.

Result & Future Plan
Out of this series, I believe this was the most successful image. But I am not done with Mars. I plan on doing another shoot of Mars with the lessons I learned from the first shoot. My main focus is to get a better landscape of Mars down, which should be much easier to do with alot less dirt in the water and larger rocks to work with to build the set.


Sunday, October 7, 2012

Setting Up a Studio Space


 This past week I spent setting up the studio space and gathering supplies for the mars landscape photography. The color dark room I'm using needed a bit of clean up before I could use it, so I spent the first part of the week cleaning it. There were two enlargers that I had to move out of there to make space for the aquarium. The room was used previous spring semester as a screen print room, so I had to clear out the supplies that were left from that and find previous owners since there were large materials left behind. Once the room was cleared out, I was able to start bringing supplies in.

Friday night I brought up the aquarium. I got measurements for how large of a hose I need to fill water from the sink, as well as the diameter to fit over the faucet nozzle. After a quick trip to Home Depot, I did a test run to make sure I could fill the tank with water and siphon water out of the tank. Test was successful.


While I had the tank partially filled with water, I went ahead and put an object I had in the tank to get test shots to determine what lens I will be using.  My 18-55mm, 3.5-5.6 Nikkor lens yielded the best results.

I also made a trip to Hobby Lobby to get supplies for the mars landscape. I got foam, foam glue and tools to sculpt as a base for the landscape. I also got foam board (one side white and one side black), as well as cotton and craft glue for sky background. This probably won't be used for Mars landscape, but I needed the white background to block the wall out. In addition I got plaster and rock molds to make the canyon look. I couldn't find the right color to paint the molds with, so I'll be stopping by hobby town after work on Tuesday and hopefully will have better luck. Also I came across a silver dust base that would work great for the future Jupiter or Neptune landscapes.

 Doing some test runs, I realized I needed some supplies that I didn't prepare for such as towels, newspaper, bowls, and possibly an extra table for more counter space which was a great run through to prep for the project. For my mars landscape I'll also be using reddish dirt clay from the Brazos river banks, so I'll be heading out Monday after class/work to go collect it. I hope Monday night to prep the rock plaster molds as well after collecting the dirt. I hope for next week to have a good portion of the mars landscape built with some test photography done to start prepping atmospheric looks and lighting.


Monday, September 17, 2012

Sketch 3: Slo Mo

After getting feedback, I did some research for microscopes to do video capability. Caffey sent me a link http://www.buy.com/sr/searchresults.aspx?qu=microscope and I did some research. Unfortunately the video quality isn't the best but thats ok. Another issue is that it had bad reviews as well, it cost money and time for shipping. Fortunately I was able to get in contact with Blinn, where I can use their microscopes to do some test footage without having to spend the money. I wasn't able to set up a appointment before this monday, so in the meantime I did some slo motion tests with the T2i.
The first one is steel wool with 60fps interpret to 24fps. The second one is BBs with 60fps interpret to 24fps, then slow down to 50%.


Next in my work is that I hope to find a way to finalize the lighting set up so I can get better quality video, as well as find a way to bring a more poetic meaning to the work. Before I was kind of leaning towards a music piece, but my focus at the moment is find a better method to get better quality and aesthetically pleasing set up for the visuals. Then I came across this artist, Kim Keever.

This reminded me of the suggestion Carol made about doing cellular environments. The direction I want to go next is create enviroments similar to the technique Keever used, but take it in a new direction of possibly doing cellular, or alien-like surreal environment.

Jared also showed me another artist similar to Keever, Mathew Albanese. He uses more household products to create his environments instead of the model sets for trains that Keever used.
http://www.behance.net/MatthewAlbanese/frame/366923

Monday, September 10, 2012

Movement in Water

Out of the ideas I presented to the class, the most response I got was from the study of movement in water idea with the dyes.

One of the suggestions was to use iron fillings in water with magnets. Since I couldn't find any, I went to the hardware store to find a piece of iron to file down, unfortunately they didn't have any iron besides curtain rods, which was too much. I also read online you can get iron from dirt, so I dropped dirt over magnets. I did get some iron, but only a little and looking at the time frame it would take way too long to get a decent amount to work with. So I ended up getting steel wool and cutting it down to small pieces.

I also had iron copper plated BB's, and also dropped that in water. It was magnetic, but it was hard to get any movement from the BB's since the magnet can only control them from the sides but not the bottom or top. I was using 6 magnets, but maybe stronger magnets might of worked better.

Also from class discussion, it was suggested to use materials that resist water. So I used vegetable oil, which gave beautiful motion in the water, but visually the colors weren't as pretty. Also, I was having issues with shadows over the lights when dropping the oil, and I need some sort of light rig where the shadows won't be visible on the camera but I can still drop the material in the water. So for now I used UV light to see what it would look like, and dropped BBs in it but they didn't show up as well, but the motion was there.

Since the only paint I had around was fluorescent tempra paint, I used that under the UV light. It gave very neat motion and was aesthetically pretty. And using UV lighting it eliminated the shadow issue.

I also did some research into Ferrofluid, which is a magnetic liquid. Unfortunately its quite expensive to buy 50mL $40 online. It is very possible to make with some work, and I found some diy here.
I think if I went down this route, I would use a large piece of glass or pexiglass and multiple magnets to control the fluid and create some sort of patterns of motion.

Monday, September 3, 2012

Sketches

Instead of doing my usual exercise of going through images for inspiration and sketching, I decided to try something more abstract to get my thoughts going. So I took photos and video taped food dye in water to see what shapes or motion could inspire me in my ideas.

Jellyfish

Face Profile

Lines

Hi Key Fish

Devil/Dancing Baby

Ideas inspired:

1. Hi key photography. Explore shapes and what an audience can see in whats missing in the image through hi key photography.

2. Hi fashion pinterest. Pinterest is full of diy. I was going to take the diy for fashion and beauty, and photograph it as if it was for an editorial for a fashion magazine.

3. Infrared photography. I've always had an interest in it, and would like to learn the technique of it and try to create artistic photos from the technique.

4. HDR. Continuing a project from the past, I would like to add to the visible light spectrum + UV, and add infrared to the mix. It would be interesting to see the "whole" light spectrum in a photo. I know infrared is on a completely differrent color pallette since it's invisble to our eye, so the photos will be a interesting mix.

5. Using the technique of the water dye, to combine different elements in water and study the motion of it. Take videos or photos, or even possibly make an installation out of it.